|
|
Post by Boomzilla on May 2, 2020 10:37:32 GMT -5
And even in advance of having the dedicated subwoofer DSP boxes online, the subwoofers are sounding GOOD with my Klipsch RP600m bookshelf speakers. There's an inline 75Hz / 12dB / octave low-pass filter AND the filters on the subwoofer plate amps are set to 60 Hz. @ / 12dB / octave low-pass. So the LF part of the music is getting double filtered while the little Klipsches are being run full-range. Surprisingly, the blend is inaudible, and the extension is wicked! The only reason this works is because of the peak in the subs' response: 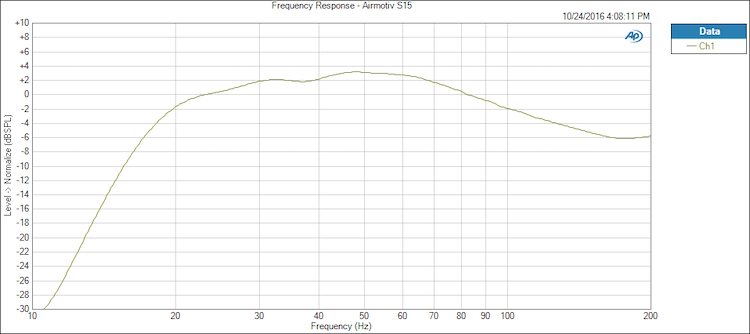 |
|
|
|
Post by Boomzilla on May 4, 2020 10:14:27 GMT -5
The Dayton DSP boxes arrive today and I'm most curious to see how well they work. I switched back to my Emotiva T2 speakers to get some bass in the absence of the subs, and have been pleased once I pulled the speakers WAY out into the room and away from the back wall. Quite a wide and deep soundstage with still surprising bass. Nothing like having the S-15 subs in the system, of course, but not too shabby. With the subs back online, I'd like to try the Klipsch RP600m speakers again, since they have a dynamic advantage over the T2s. But I'm not getting rid of the T2s until Hair Nick reports back on the "stacked T2" concept. |
|
|
|
Post by Boomzilla on May 6, 2020 5:42:59 GMT -5
The Dayton DSP boxes did NOT arrive yesterday. Instead, some adapters arrived that are a part of the DSP box system.
I can say that the little Klipsch RP600m speakers (with the help of the Airmotiv S-15 subs) sound ravishing! I'm running the Klipsches full-range and using the crossover on the subs' plate amps to try and blend them in below the roll-off of the mains. It works, but isn't totally successful. There are peaks and dips in the response (especially around the crossover area - from 40 to 60 Hz.). THAT's what I'm hoping the DSP boxes can cure...
|
|
|
|
Post by Boomzilla on May 10, 2020 13:24:03 GMT -5
And my audio amigo IS right about one thing - He says that some ripping programs are more effective than others. I've noticed recently that even with brand-new, flawless-surface CDs that dB PowerAmp shows "imperfect rip" on many of the tracks. Yet when I rip the same disc with jRiver Media Center 26, it correctly rips every track (or at least says it does). Same disc, same drive, same destination. Mi amigo has every ripper ever made, and claims that either Arcsoft (a freebie that came with Memorex drives) or jRiver Media Center 26 are the two best of the entire bunch, and by no small margin. But even then, he says that if those two won't rip a disc properly, sometimes one of the other programs will. The third in line, he says is Exact Audio Copy.
|
|
|
|
Post by megash0n on May 10, 2020 13:45:57 GMT -5
And my audio amigo IS right about one thing - He says that some ripping programs are more effective than others. I've noticed recently that even with brand-new, flawless-surface CDs that dB PowerAmp shows "imperfect rip" on many of the tracks. Yet when I rip the same disc with jRiver Media Center 26, it correctly rips every track (or at least says it does). Same disc, same drive, same destination. Mi amigo has every ripper ever made, and claims that either Arcsoft (a freebie that came with Memorex drives) or jRiver Media Center 26 are the two best of the entire bunch, and by no small margin. But even then, he says that if those two won't rip a disc properly, sometimes one of the other programs will. The third in line, he says is Exact Audio Copy. It's cause jriver uses eacto3 I think. Same as many of the "free" tools. This is what I use behind the scenes for all of my movie conversions and audio reencodes. I'll make a 640k AC3 5.1 channel track as the 1st audio track and leave the lossless audio as the second track. So, when played on any Xbox in my house, it will work, but when I watch in my bedroom, I can select the lossless track. |
|
|
|
Post by Boomzilla on May 11, 2020 17:40:44 GMT -5
Learnings from the making of your own XLR cables... What prompted me to indulge in such an activity? The possession of what I initially thought was solid-silver, three-conductor, 24AWG, solid-core wires with both a Teflon sheath and fabric-wrap for each of the three strands. Turns out the "silver" was only a silver-colored coating over copper core... But I digress - Upon perusing Amazon, I found quite the variety of XLR connectors and, being my father's son (dad grew up during the great depression), I bought the least-expensive. Big mistake number one... The Chinese XLR connectors consist of a plastic thread-on compression sleeve that tightens a three-pronged plastic compression gripper. The sleeve has a hard plastic ring in it that also forces the plastic connector plug into the housing. To solder wires to the ends, you must take both ends apart, thread the compression sleeve and the compression gripper onto your wiring, and then solder your ends to the connector plugs. Issue 1 - If you heat the wires and plug-connectors up sufficiently to get a hot solder joint, the plastic plug-connectors melt and now your pins or sockets are no longer lined up! After that experience, I decided that I could leave the male and female plug connectors connected while soldering and each end would serve as a heat sink for the other. The first time I tried it, the two plastic plug connectors melted together and wouldn't separate without major surgery. I then learned to plug the male and female connectors together - but without letting the plastic plug-connectors touch! Success! Issue 2 - Reassembly of the ends. The plug connector housings are fitted with an internal slot that keys to a protuberance on each of the plug-connectors. Miss the slot and the plug connectors won't go into the housings (brute force and awkwardness not withstanding). So I got the plug-connectors back into the housings once I noticed the slot. But the next one I tried to assemble caused the thread-on compression sleeve to break. It turns out that the three-prong plastic compression gripper ALSO has a protuberance on it that is intended to key into the same slot in the connector housing. This makes sense, I guess to prevent the gripper from rotating and putting axial stress on the wire. I finally noticed the compression gripper key for the housing slot, and all was well except the threaded housing that was now cracked from end to end. After making a cup of coffee to contemplate, I finally decided to "weld" the plastic threaded housing using the soldering gun tip. Success on first try! Now the housing threads properly again. Lessons learned: a) If you're going to make your own interconnects, buy good ends. With the cheap ones, you get EXACTLY what you pay for. b) Disassemble and reassemble your ends several times so that you understand ALL the "gotchas" before you begin soldering. c) Determine what on your ends can melt (and what can't) before you begin soldering and protect the low-temperature-melting-point parts. d) Remember to clean and tin the wire tips BEFORE trying to solder them to the connector terminals e) Pay CLOSE attention, ensuring that the source terminals and destination terminals match - double check your work with your VOM. f) Have fun! I managed to run wife out of the house with the smells of soldering (I didn't have the pity to let her know that the smell was benign resin instead of toxic lead...) g) Don't forget that it's Miller Time once your interconnects are complete! El Boomeira |
|
|
|
Post by Boomzilla on May 22, 2020 13:05:30 GMT -5
Well, I've had a merry time over the past few days trying to force a computer (any computer) to recognize a SATA hard drive in an external USB docking cradle.
My Windows machines said it was MBR and unallocated, but wouldn't allocate or format it saying that "the task could not be performed because of an io device error." The Mac machines just didn't see it at all (not even in Disk Utility).
I changed the USB cable, I changed the cradle's power supply, I used different discs in the same cradle (they worked perfectly), and I used various downloads from the internet to work on the disc. Long story short, nothing worked.
Until I changed cradles to a newer model from the same manufacturer (Sabrent). With the new cradle, I was able to at least see the dive from my Mac. I then went to the command prompt on my MacBook Pro and began forcing commands through. Success! Finally the Mac saw the drive, and I was able to pick up the drive when I plugged it in.
Some of this is my own fault - I should know by now NOT to switch hardware back and forth between Windows and Mac. Both are competent systems, but they just don't play well together.
But all's well that ends well and I've got my drive back.
Boom
|
|
|
|
Post by Boomzilla on May 23, 2020 10:50:42 GMT -5
And having the wire to spare (14 AWG, 600V Insulation), I decided to make some custom-length power cords: |
|
|
|
Post by SteveH on May 23, 2020 13:59:09 GMT -5
And having the wire to spare (14 AWG, 600V Insulation), I decided to make some custom-length power cords: Be careful with those cords. United States power cords must meet UL Standards 62 and 817, the one pictured definitely does not meet any of the criteria. |
|
|
|
Post by Boomzilla on May 23, 2020 14:09:08 GMT -5
Actually, both ends have strain-relief clamps internally. Without a secondary sheath, they’d be unsuitable for in-wall use, but the 600VAC-nylon insulation, combined with a clear-plastic outer protective layer (good to 95C) should make these far safer than common lamp cord.
They’re also gasoline and grease resistant, invulnerable to water, acids and bases, and acceptable for industrial use.
|
|
|
|
Post by SteveH on May 23, 2020 14:23:35 GMT -5
Actually, both ends have strain-relief clamps internally. Without a secondary sheath, they’d be unsuitable for in-wall use, but the 600VAC-nylon insulation, combined with a clear-plastic outer protective layer (good to 95C) should make these far safer than common lamp cord. They’re also gasoline and grease resistant, invulnerable to water, acids and bases, and acceptable for industrial use. You are correct, but lamp cord is designed for low current applications and lamp cord cannot be two totally independent single conductors woven together, nor can a flexible power cord. A flexible power cord is required to be sheathed for safety. |
|
|
|
Post by jmilton on May 23, 2020 16:00:06 GMT -5
And having the wire to spare (14 AWG, 600V Insulation), I decided to make some custom-length power cords: Be careful with those cords. United States power cords must meet UL Standards 62 and 817, the one pictured definitely does not meet any of the criteria. Hey, leave Sparky alone! |
|
|
|
Post by pedrocols on May 23, 2020 16:22:33 GMT -5
Actually, both ends have strain-relief clamps internally. Without a secondary sheath, they’d be unsuitable for in-wall use, but the 600VAC-nylon insulation, combined with a clear-plastic outer protective layer (good to 95C) should make these far safer than common lamp cord. They’re also gasoline and grease resistant, invulnerable to water, acids and bases, and acceptable for industrial use. You are correct, but lamp cord is designed for low current applications and lamp cord cannot be two totally independent single conductors woven together, nor can a flexible power cord. A flexible power cord is required to be sheathed for safety. But I am sure they are Cyro treated. |
|
|
|
Post by SteveH on May 23, 2020 18:48:18 GMT -5
Be careful with those cords. United States power cords must meet UL Standards 62 and 817, the one pictured definitely does not meet any of the criteria. Hey, leave Sparky alone! I don't want see Boom go BOOM!  |
|
|
|
Post by Boomzilla on May 23, 2020 21:46:26 GMT -5
I don't want see Boom go BOOM! T’won’t be the first time, nor shall it be the last... I’ve been around 50KV gear before, back when our plant electrician would work on the switchgear hot (the trick is not to sweat - you can feel the voltage on your skin, looking for somewhere to go, but if your skin is dry, there’ll be no arcing - true story...). I’ve done 110/220VAC work in my home for years & then had it inspected & stamped by an electrician from the plant who had a current license in my parish (“county” to those of you not from Louisiana). So although I’m no power wiz, I haven’t shocked myself yet. |
|
klinemj
Emo VIPs  Honorary Emofest Scribe
Posts: 14,746
|
Post by klinemj on May 23, 2020 22:08:31 GMT -5
So although I’m no power wiz, I haven’t shocked myself yet. I said something to this effect once. I can't say that any more. Mark |
|
|
|
Post by Boomzilla on May 23, 2020 22:21:21 GMT -5
Messages from the subwoofer no-mans-land:
Due to the fact that I'd previously gotten flatter frequency response from subs in my room corner than I had on the walls, I moved those puppies back to the corner & stacked them one atop the other. I had initially pointed the passive radiators into the corner, expecting that the corner would act as a horn and increase their efficiency. Strike one. The DSP analyzer in the Dayton boxes gave anything but a flat frequency response when aligned that way.
Plan B - I left the subs in the corner, and stacked atop each other, but rotated the stack 180 degrees so that the passive radiators now faced the listening position (the actual drivers are on the bottom). MUCH flatter, but still not as tight as they were when on stands.
I did, however, discover that boosting the 20Hz. area on the subs is NOT a good idea. Not because the subs can't handle it, but rather that a number of my recordings have subsonic rumble on them! Maybe they were recorded in New York with trucks rumbling by outside? Not all recordings display this trait, but even on the same CD, some tracks may have it while others don't. I found that equalizing the boxes to be flat to 25Hz. seemed to banish the rumbles.
So I also wanted a very (VERY) steep high frequency roll-off for the subwoofers lest they muddy up the main speakers as well. So I set the crossovers to start their roll at about 45 Hz. and by just over 100Hz. they're WAY down. But with such a steep slope, the response curve became rather peaked (more than when playing the subs flat). So I set up a DSP band every five Hz. from 45 down to 20 Hz. There's enough overlap that changing one changes the others, but I was able to get a ruler-flat response from 45 to 25 Hz. by dropping the entire band to the -5dB level relative to the speakers. The sub plate amp has more than enough power to make up the difference.
After saving the curve for each individual sub, I pulled out my Klipsch RP600m bookshelf monitors, attached them to my 12-watt Heathkit Mono-Blocks, and drove the whole rig from a borrowed Black-Ice/Jolida Glass FX DAC playing through a passive volume control (although WITH remote-volume-control). The passive volume control's outputs employ a splitter to drive both the subwoofers and the Heathkit amps. AND?
WOW! This is the very best sound I've heard in my room yet. The bass turnover is not audible except for the speed difference between the 15" subs and the 6" Klipsch woofers. Tomorrow, I'll put the subs back up on their stands, get them out of the corner and away from the wall, then rerun the DSP to blend & flatten them again. If I'm lucky, that'll cure the speed difference.
But the tube DAC is really something!
Boom
|
|
|
|
Post by Boomzilla on May 24, 2020 5:41:13 GMT -5
On electricity...
I gained my respect for electricity at the chemical plant (50,000 Volt switchgear). I've racked many a 2,000 volt breaker in and out.
But the concepts are simple, and if you respect the hazards (and double check everything), you'll be safe. The first house we bought had a 220 volt electric stove. We decided to put in a gas stove, and to split the 220 circuit so we'd have a couple of heavy-duty 110V circuits - one for the new dishwasher, the other for the microwave.
So I went to the breaker box, turned off the kitchen circuits, came back to the kitchen and checked - the stove was still hot.
So I went back to the breaker box, turned off every breaker in the house, came back to the kitchen and checked - the stove was still hot.
So I went to the disconnect switch for the whole house, and disconnected the house from the power grid completely. Came back to the kitchen, and without checking again, began separating wires - until I noticed a spark!
I went back to the disconnect switch, opened it up, and discovered that whomever had installed the electric stove (most certainly NOT an electrician nor anyone who understood anything about electricity) had tied in the stove wiring UPSTREAM of the house disconnect switch - directly off the meter pan!
Having no other choice (it was a holiday weekend and the chances of finding an electrician were nil), I put on rubber boots and rubber gloves, and removed the (still hot) stove wires from the meter pan outlet. I then went to a hardware store, bought two new breakers, and installed the breakers on the two new 20-ampere, 110V circuits.
Lesson learned? NO MATTER HOW SURE YOU ARE THAT THE CIRCUIT IS DEAD, TEST IT ANYWAY.
So I understand and respect electricity. I used to know how to wire house circuitry per the National Electric Code, but being old and lazy, I no longer do it. The cost of hiring an electrician gives any future potential purchaser of the house confidence that it is wired right, and that adds to the value.
But even when I hire an electrician, I bird-dog her/his work to satisfy myself that it's done right.
Cheers - Boom
|
|
|
|
Post by Boomzilla on May 25, 2020 15:44:31 GMT -5
OK - Some here's some frequency curves from the Dayton DSP-LF (measured via my iPad, whose screen was photographed with my iPhone). The first measurement taken is the blue line - inches away and equidistant from the driver and the passive radiator. The second measurement taken is the green line - taken from the listening position. Notice how room peaks and nulls have (significantly) modified the frequency response from the near field readings. The box was told to correct, as best it could for linear response, and the result is the red line - taken, again, from the listening position. One can take a single reading for each line, or multiple readings which the box averages. After the box has done its best to smooth response at the listening position, you have the option to insert up to 24 parametric equalizer parameters to further flatten the curve (or to modify it to your taste). The rule of thumb with those equalizers is you can cut peaks, but don't bother trying to fill in the dips - you're just creating more distortion without actually doing any good. The black line at the bottom, if I recall correctly, is the distortion, and the top line, the phase. If you exceed 20% distortion at any frequency, the box notifies you. You can also select the crossover point and the steepness of the subwoofer's roll-off. Not too shabby for $70... |
|
|
|
Post by Boomzilla on May 26, 2020 15:44:05 GMT -5
Did a huge closet cleanup today, and found this at the bottom under a ton of other stuff: Monster Cable XP-C1 spool - Good for in-wall use if desired, and features: "Specially designed cable windings for more accurate transfer of music signals" (  ) Patented "Magnetic Flux Tube" construction breaks up internal magnetic fields for more natural music reproduction (ditto) Linear Polyethylene (LPE) insulation around conductors reduces dielectric signal loss for greater clarity (What?) Unique round shape with smooth, flexible jacket for easy installation ("unique round shape???") And in spite of my skepticism about their claims, this is pretty nifty cable. Was originally a 100-foot spool, but I'd guess that only about 50 or 60 feet are left. $30 with free shipping to CONUS. |
|


 )
)

