DIY "Superchunk" Corner Bass Traps
Aug 28, 2015 20:13:27 GMT -5
autiger, knucklehead, and 10 more like this
Post by jlafrenz on Aug 28, 2015 20:13:27 GMT -5
I am sure that many of you have researched bass traps of several varieties including the "Superchunk" design. For those of you who haven't, they are a fully filled corner bass trap that goes from floor to ceiling and use what many call "pink fluffy" insulation. Most people will know this as the common in wall insulation that you would find in many of our houses. Often times it is pink, but not all manufacturers are. There are several different ways to build these so my way is by no means perfect for every situation nor is it set in stone. It is simply the way I came up with after revving many different designs.
What you will need
Tools
Saw - just to cut 1x2's
Utility knife
Tape measure
Pen/Pencil/Sharpie
Glove - optional, but helpful
Staple Gun
Drill
Screwdriver - powered is ideal
Straight edge
Materials
Roll of unfaced insulation - this is the kind without paper backing. I used R-19
1x2's
Screws
Roll of Velcro
Screws
Zip-its - depending on if you hit a stud or sheet rock
Flat piece of wood for base
Cloth of your choice - acoustically transparent of course
The first step is to decide how large of a bass trap you want. I used R-19 that was 23" wide so that it would give me roughly a 32.5" face. You can use the 15" wide for roughly a 21" face. I chose the larger because the room these went in needed more absorption. You may do some research and find that the wider faced (and therefore deeper) traps perform better for this type of bass trap. I also chose R-19 because it was the best balance of cost of material and trying to reduce the number of cuts I had to make. This stuff can be itchy. If you use thinner, you will need more pieces. Measure the height of your ceiling and determine how many pieces you will need based upon the thickness of material you choose. It will compress slightly. As part of my method, I wanted to minimize this.
Start by unrolling the insulation and using a strait edge to cut it into squares based upon the width you chose.
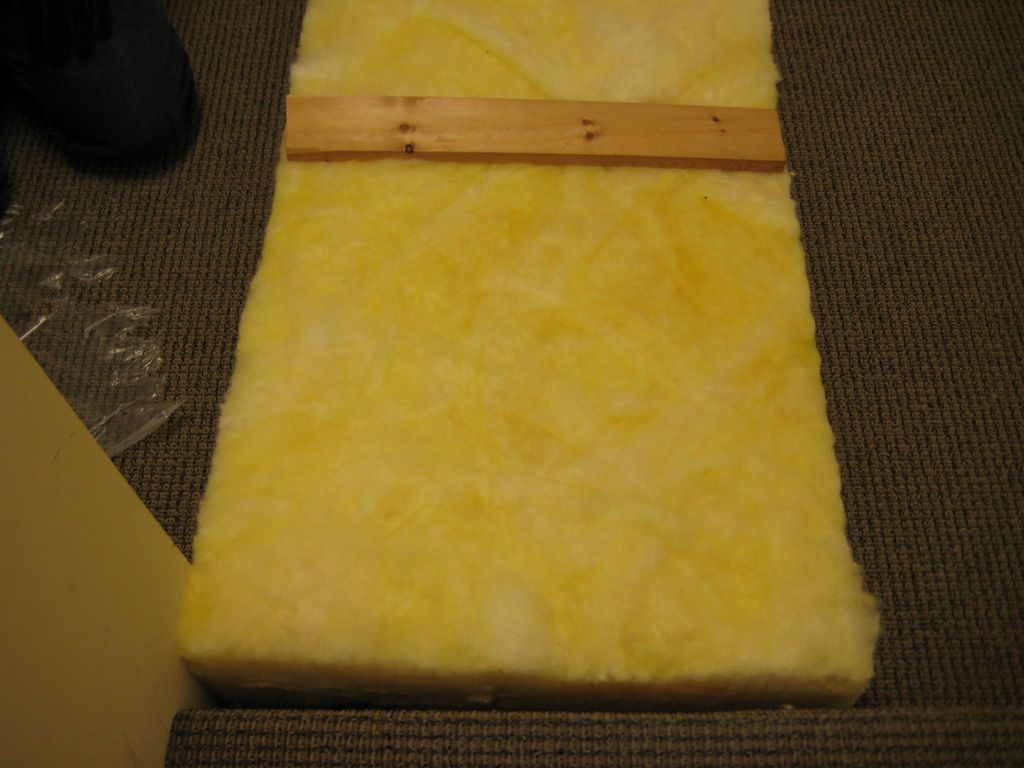
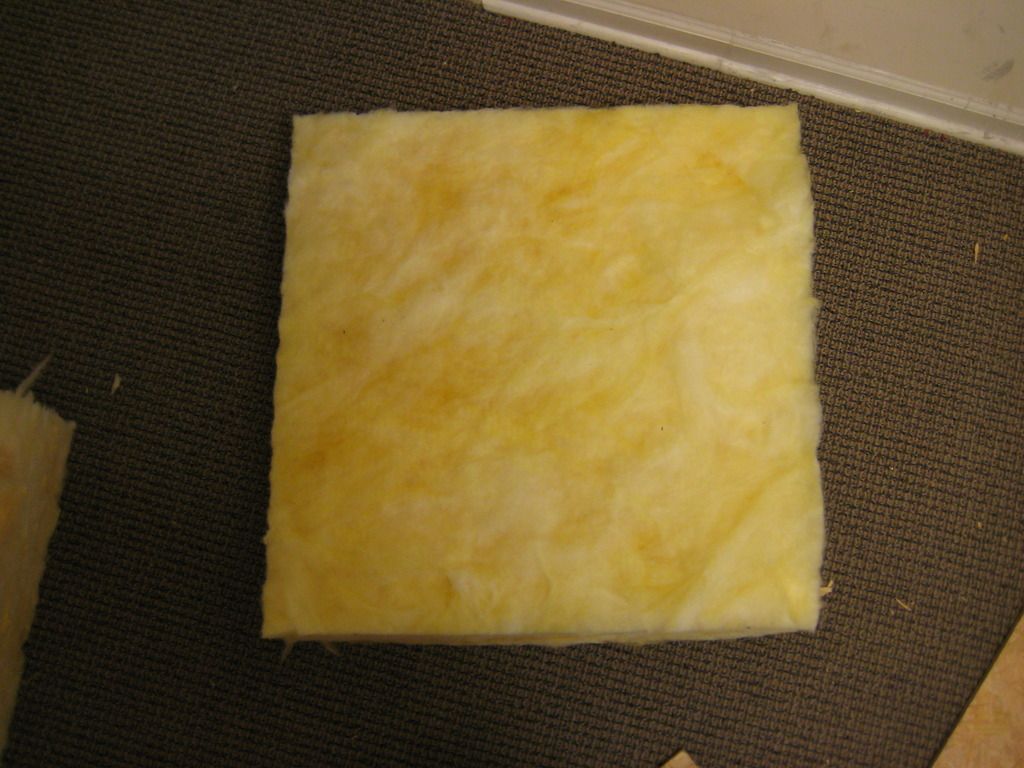
Once you have squares, cut them in half diagonally. These will be the pieces you stack to create the bass trap.
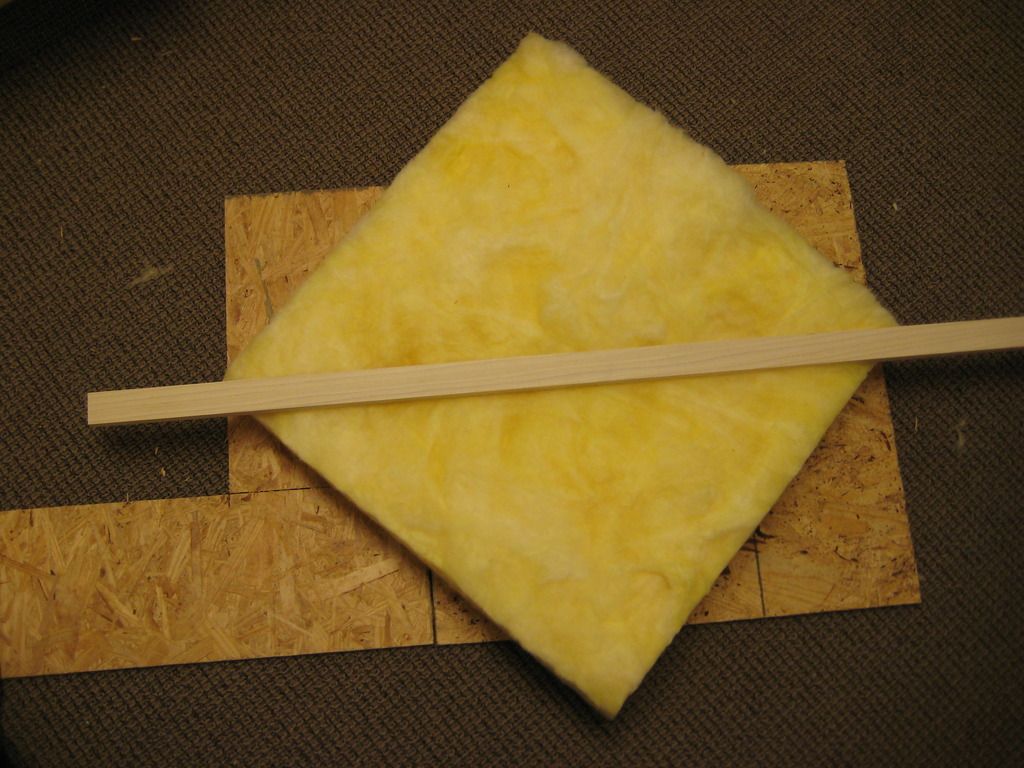
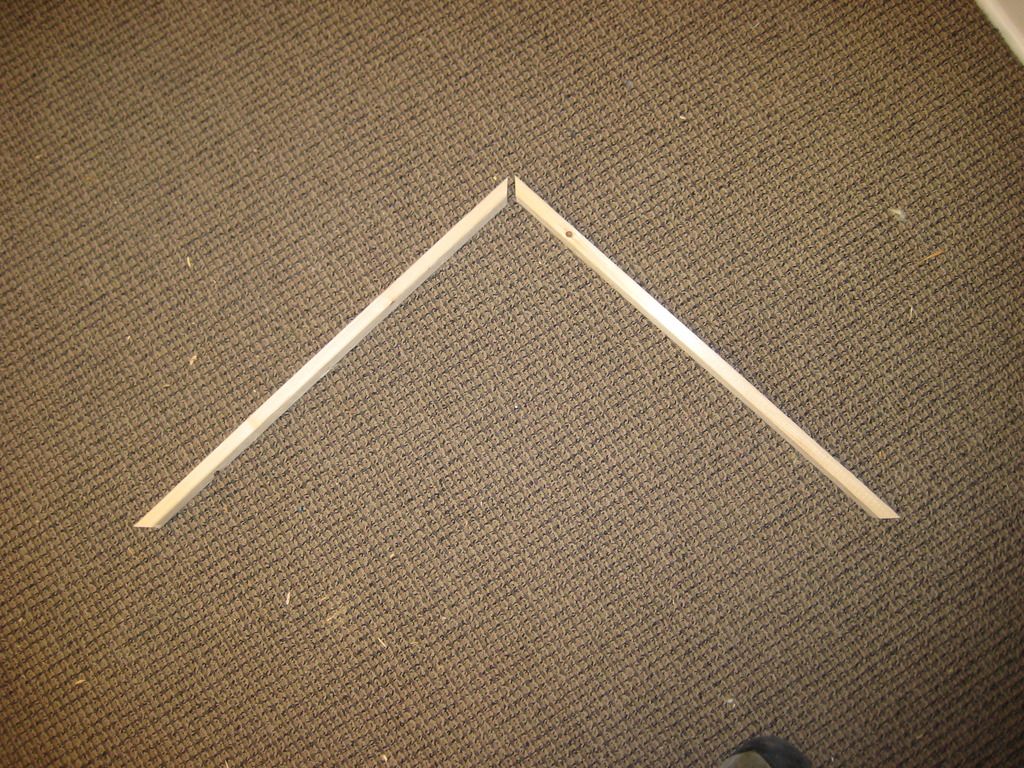
Once you have the amount of wedges you need, you are ready to build the bottom platform. I built mine this way because the room has trim and I wanted the bass trap to start on top of the trip so the front cover fit better and did not protrude out. I built this by cutting 1x2's with 45" on each end so that the longest side was the same length as the outer edges of my insulation wedges (not the face of the trap).
Notice the direction of the 45 degree cuts and how they fit together in the corner. You will also want to note that the way to cut the board is with the 2" portion vertical so it gives you the most area to attach it to the wall later.
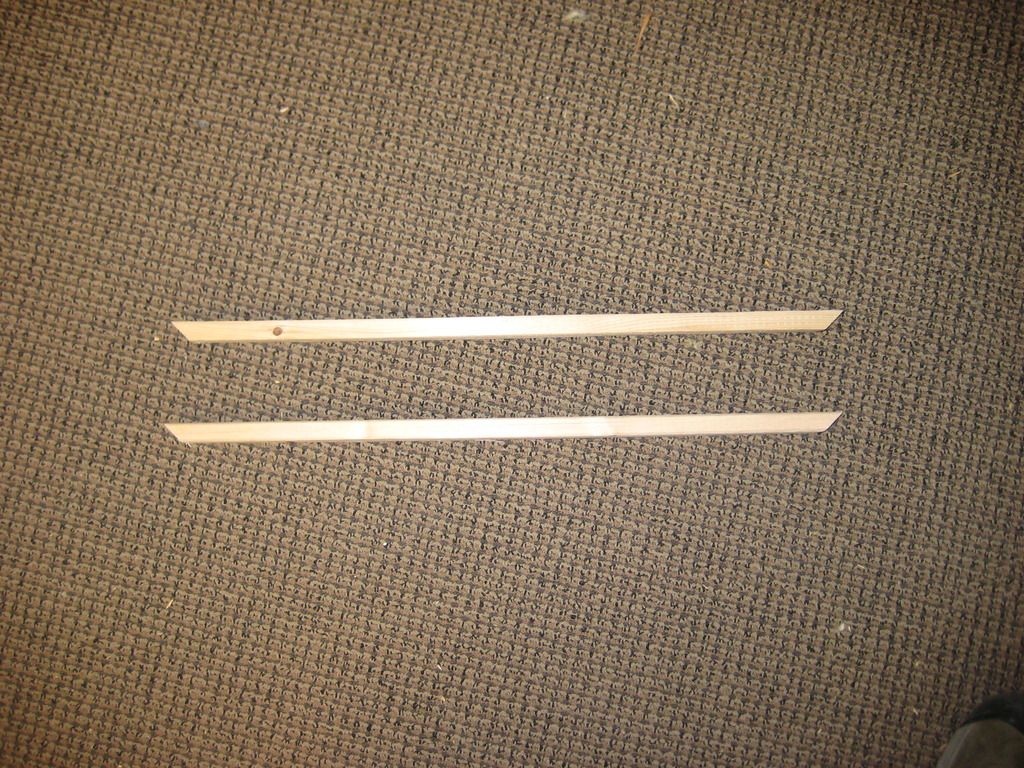
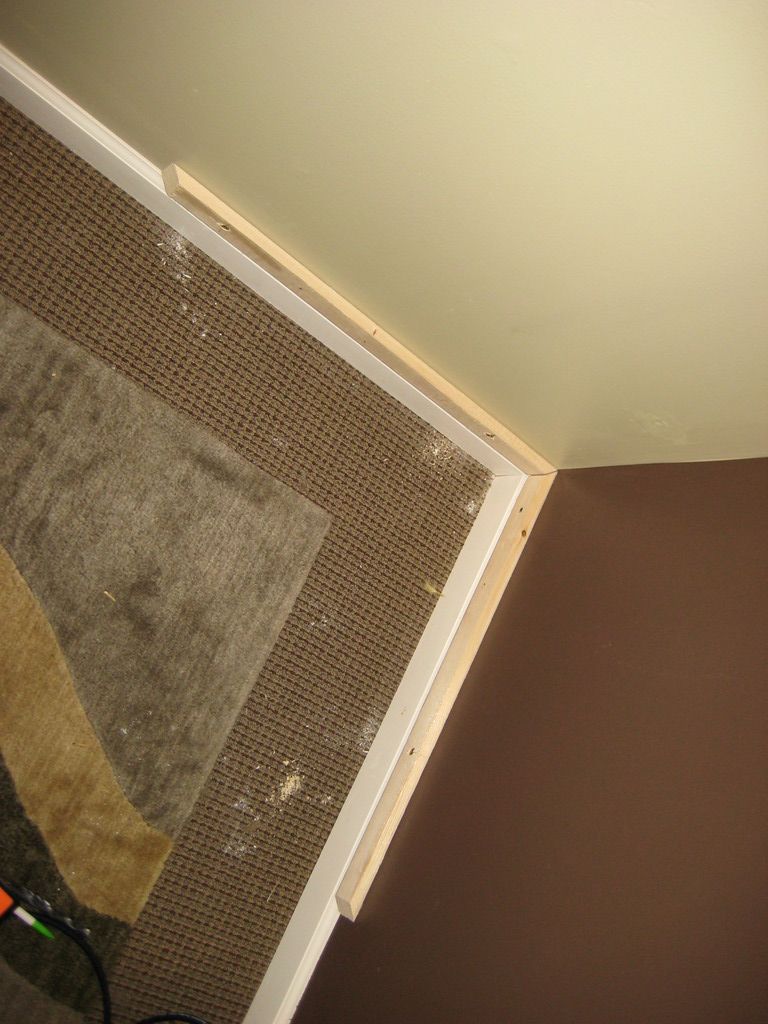
Now you will need to attach these to the wall. If you know where the studs are, this is ideal. If not, you can use something like a zip-it (wall anchor) to screw into sheet rock. Either way, make sure that you pre-drill the 1x2's so they do not split. The picture below shows the 1x2's sitting right on top of the trim to start my base.
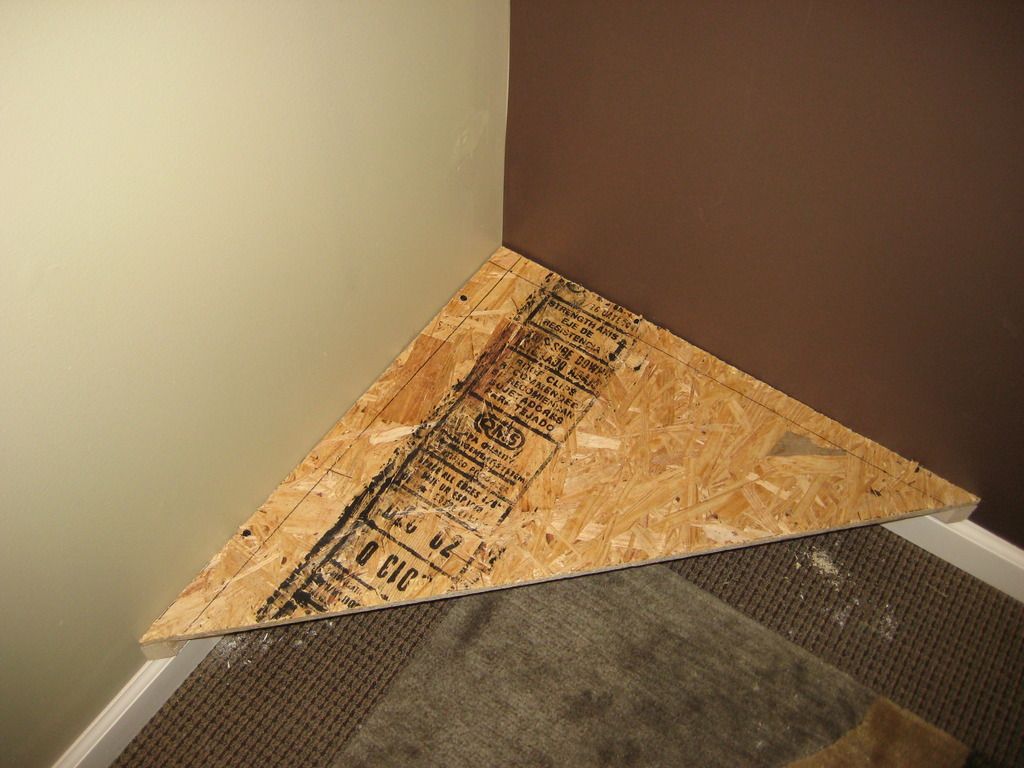
I then used a piece of wood and cut a triangle the same size as my insulation wedge for the insulation to sit on and not sag. This doesn't have to be any special type of wood. Just something sturdy. I did screw the wood into the 1x2 base.
Next you will repeat the same steps with the 1x2's every couple of feet up the wall. This is so that you can stack a small amount of the insulation and keep it from collapsing under its own weight.
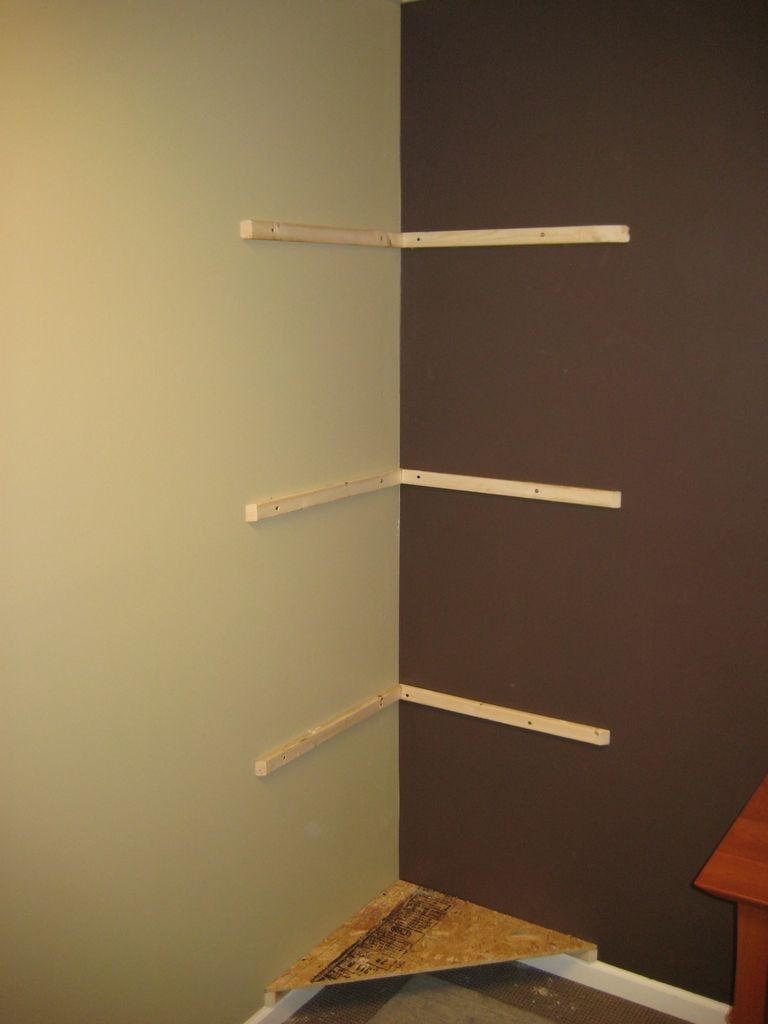
Instead of using a wood platform for the additional supports, you will need to cut an additional 1x2 with 45's so that the longest side is the same width as the width of the face of your Superchunk. These pieces will become multi functional later in the process. These will need to be screwed into the existing 1x2's already attached to the walls. Be sure to pre-drill.
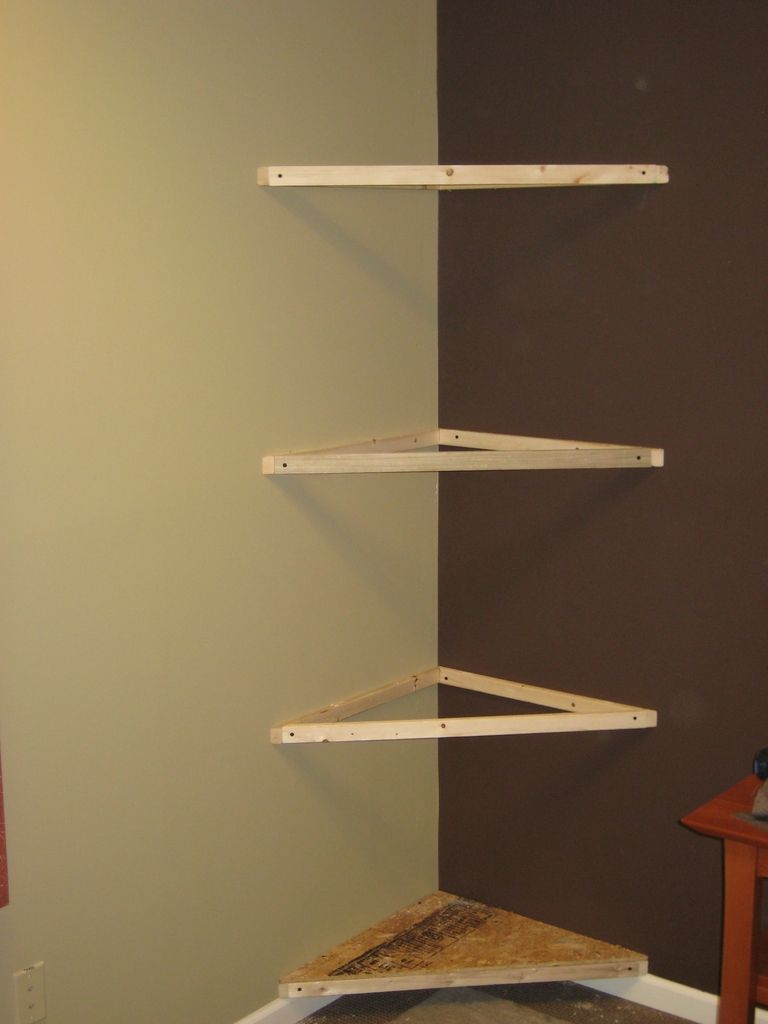
Now that you have multiple shelves built to act like a skeleton, you will need to provide some more support so that the insulation doesn't sag through the middle. For this we don't want wood that creates multiple chambers, but rather an acoustically transparent shelf. For this, I cut and stapled some inexpensive fabric that was stretched across the frame.
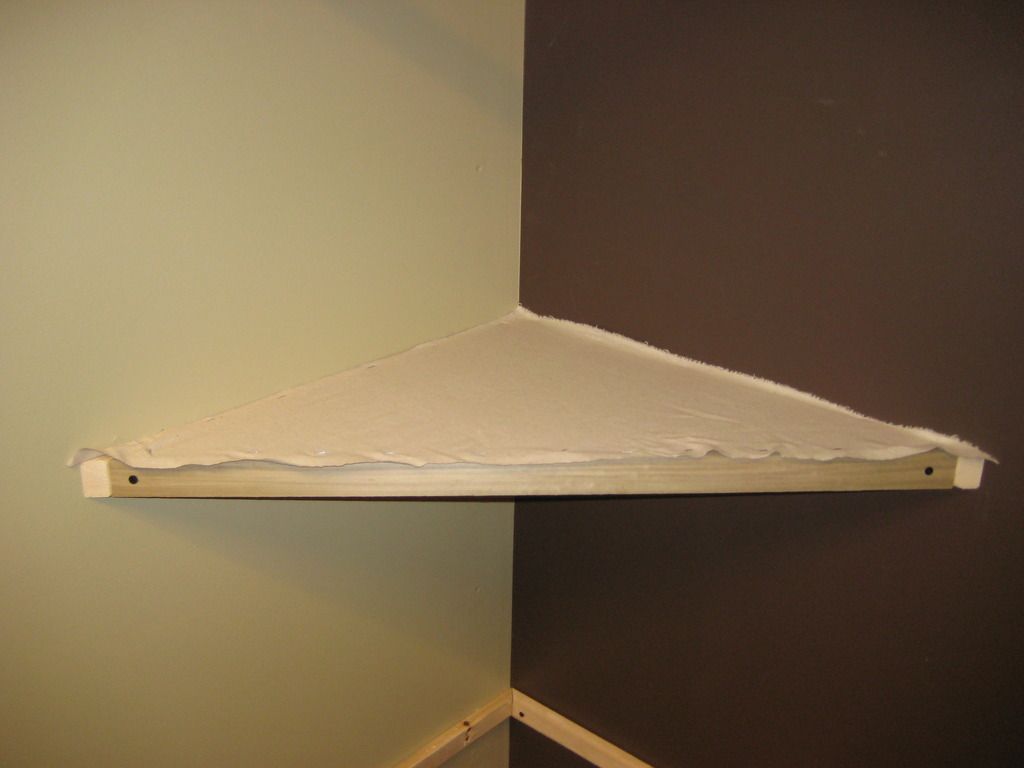
Repeat this process for the remainder of your additional supports. Once this step is completed it is time to create an attachment point for the front frame/cover. I used a roll of Velcro that can be found at any hobby store. I cut pieces the width of my front facing 1x2's and stapled to them. No need to do every single one as I found that going every other one for me held the front frame/cover in place. For me, this was one at the top, bottom and a couple in the middle.
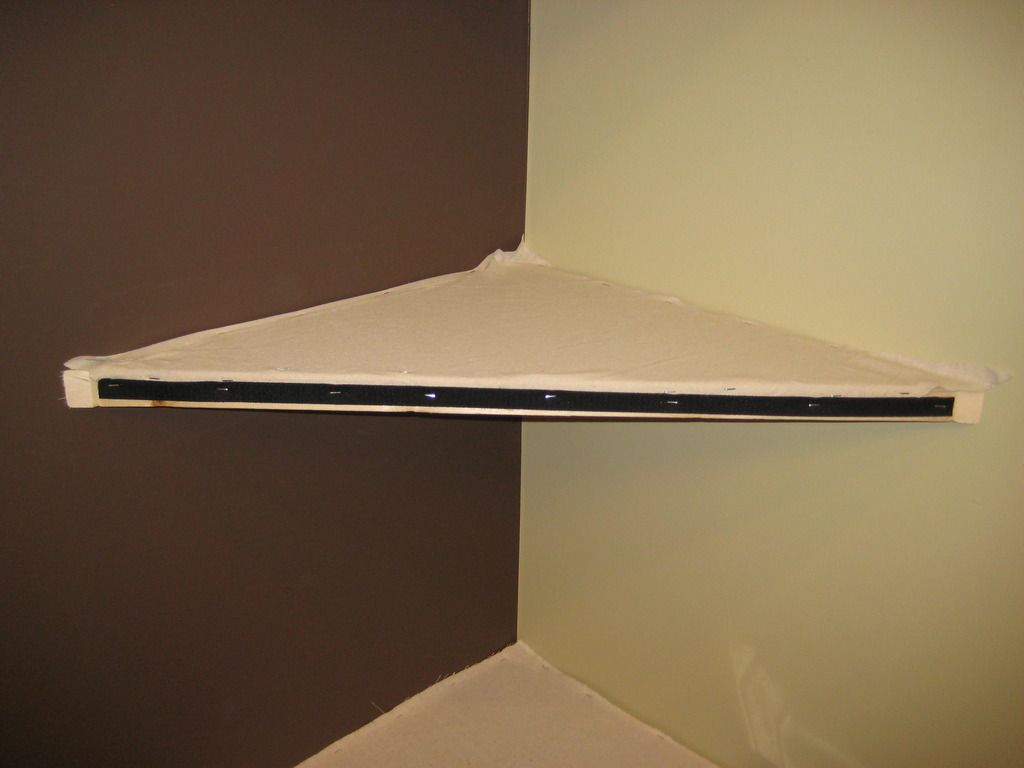
Now it is time to start stacking the insulation wedges in each of the sections you have created.
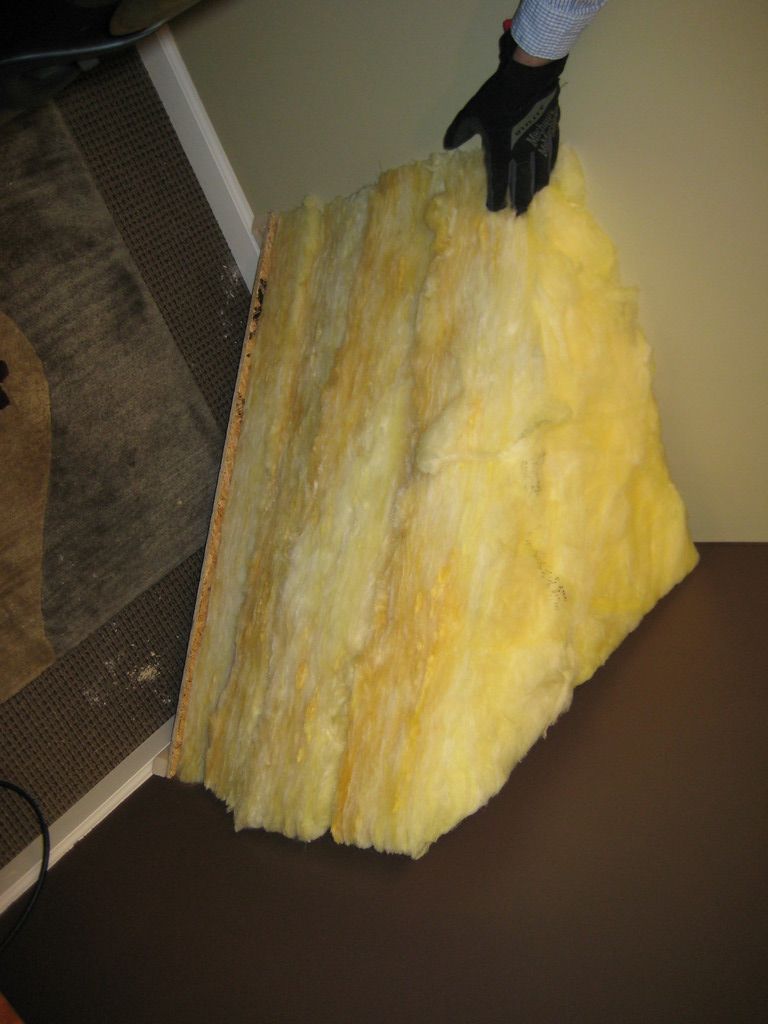
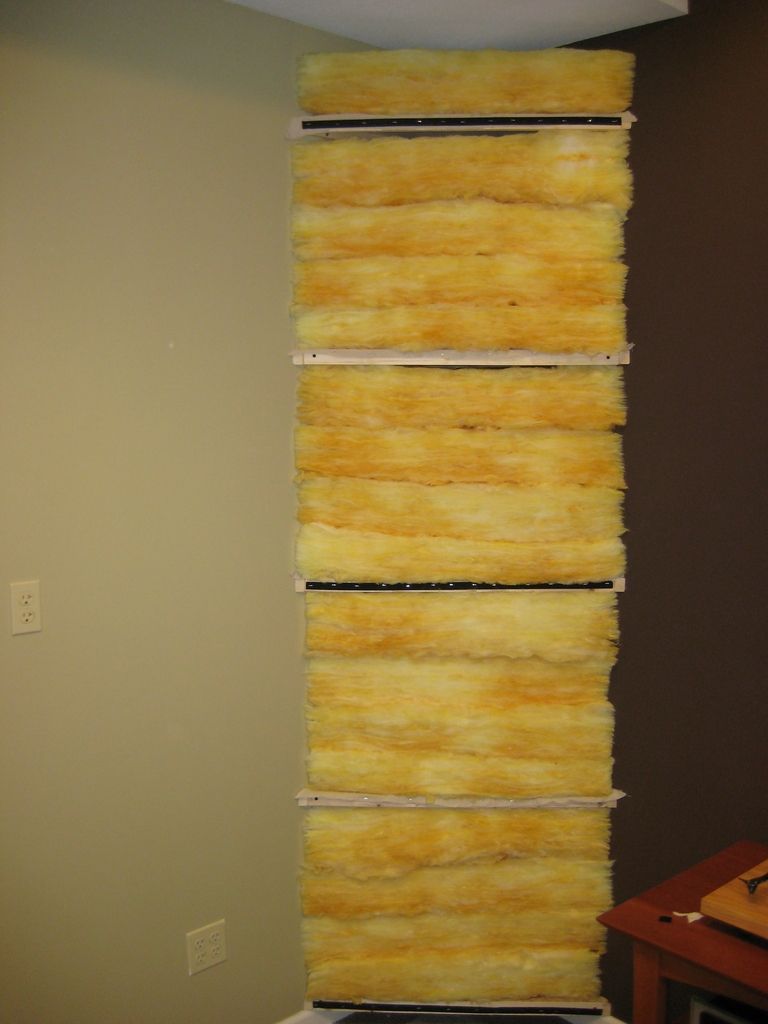
I found that with R-19 is seemed to be about 4 pieces that would fit nicely without compressing too much under its own weight. You may have different results based upon what insulation value you choose. Also notice the Velcro strips as they are about to come into play again.
Once the corner is full of insulation, you will want to make a cover for them that keeps the fibers in and has a nice finish. I chose to build a simple frame that would act like a speaker grill. They are also removable if I were to need to access the material for any reason. Thus the reason for the Velcro. All you really need is a simple frame that is as tall and wide as your trap. In the corners you will want to pre-drill a hole and use some screws to connect the 2 pieces. With the outside structure of the frame built, you will need a couple more strips that will help brace it and attach it to our corner frames. In order to do this, you will need to measure from the bottom of your base to the strips of wood that you applied the Velcro to. Cut a cross brace and screw it into place on your outer frame at the measurement you just took. Repeat this for however many Velcro points you have. For mine, this was 2 cross braces as I used Velcro at the top and bottom for a total of 4 attachment points. Once you have these braces in place you can add some additional corner braces to keep the cover from flexing. To do this, simply use some of the scrap lumber you have from previous cuts to make a few short pieces and cut 45's on each end.
Note that you will want to cut the 1x2 so that with 2" portion will be facing you so that the frame is more flat. You may also want to spend the extra for premium 1x2's for the frame as they are much straighter and this will be the part that is seen. For the sections attaching to the wall, standard 1x2's are fine as you will be cutting them down and can help avoiding some of the really curvy ones.
Here is one with the outer frame and cross braces. Note that yours may not turn out exactly like mine with the smaller section at the top. It just so happens that with the ceiling height I was working with and allowing for 4 sections of the insulation, this is simply how it turned out.
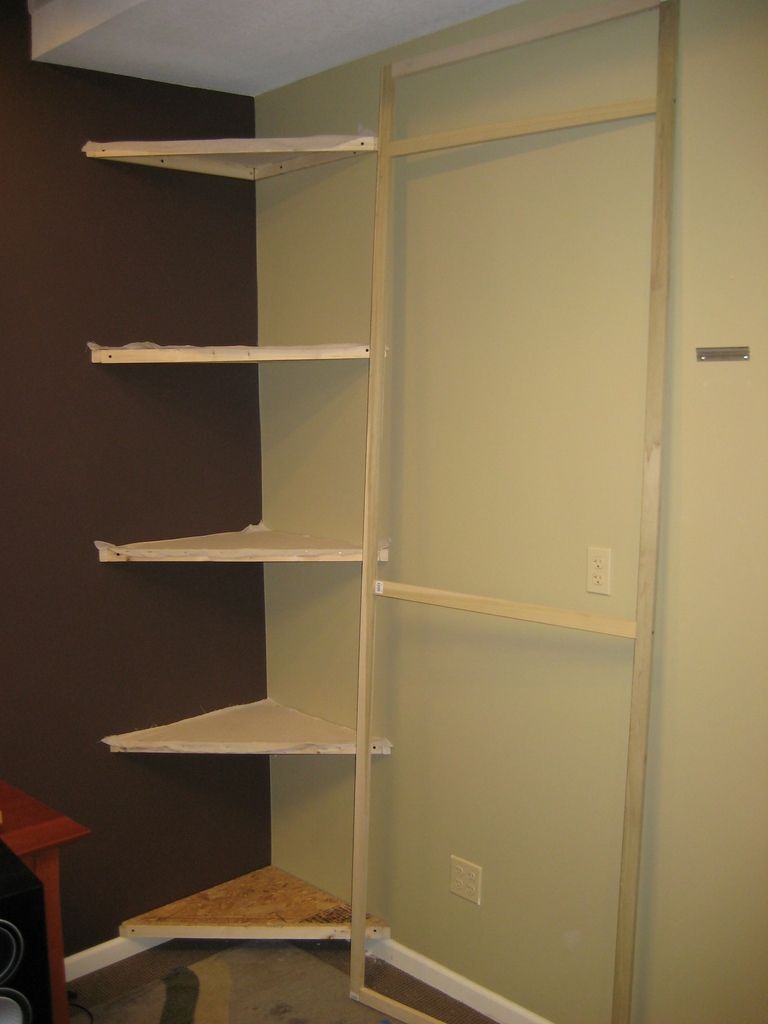
Here it is with the additional corner braces.
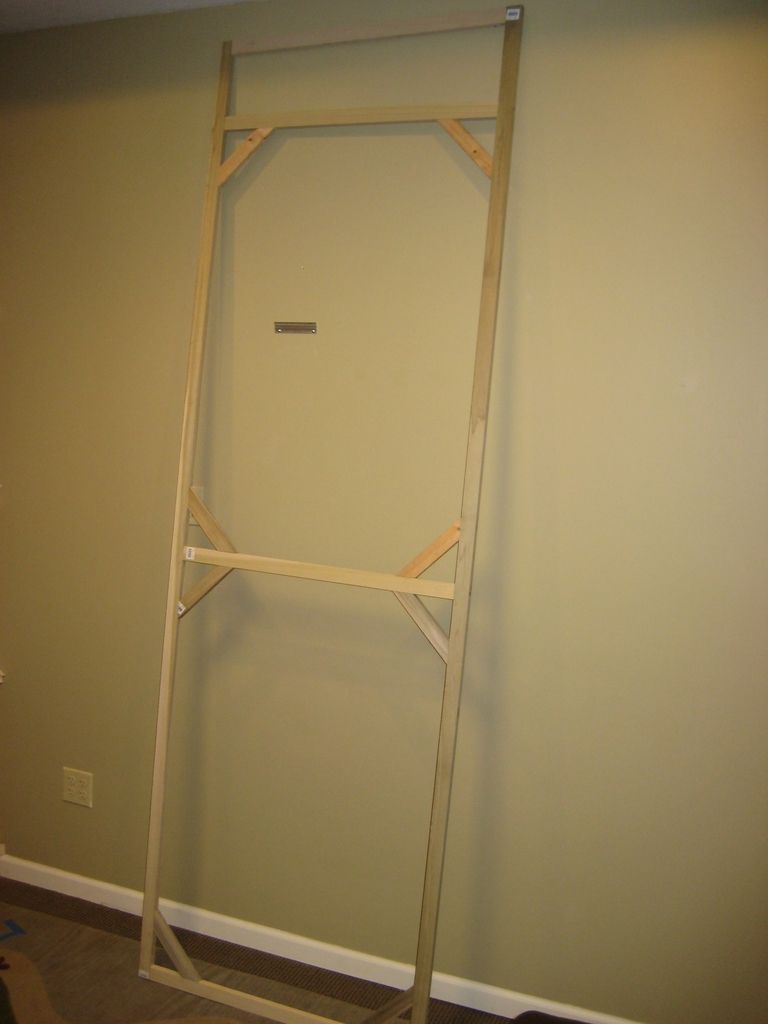
Once your frame is built you can staple a strip of Velcro at the cross brace that matches up with the shelf you built in the corner that also has Velcro. Many of the rolls you can buy of this are double sided so make sure you have the opposite side exposed towards the wall brace so it will hold. You can also leave the strip just a bit short as you will want to leave room for your finishing fabric to be stapled around the frame.
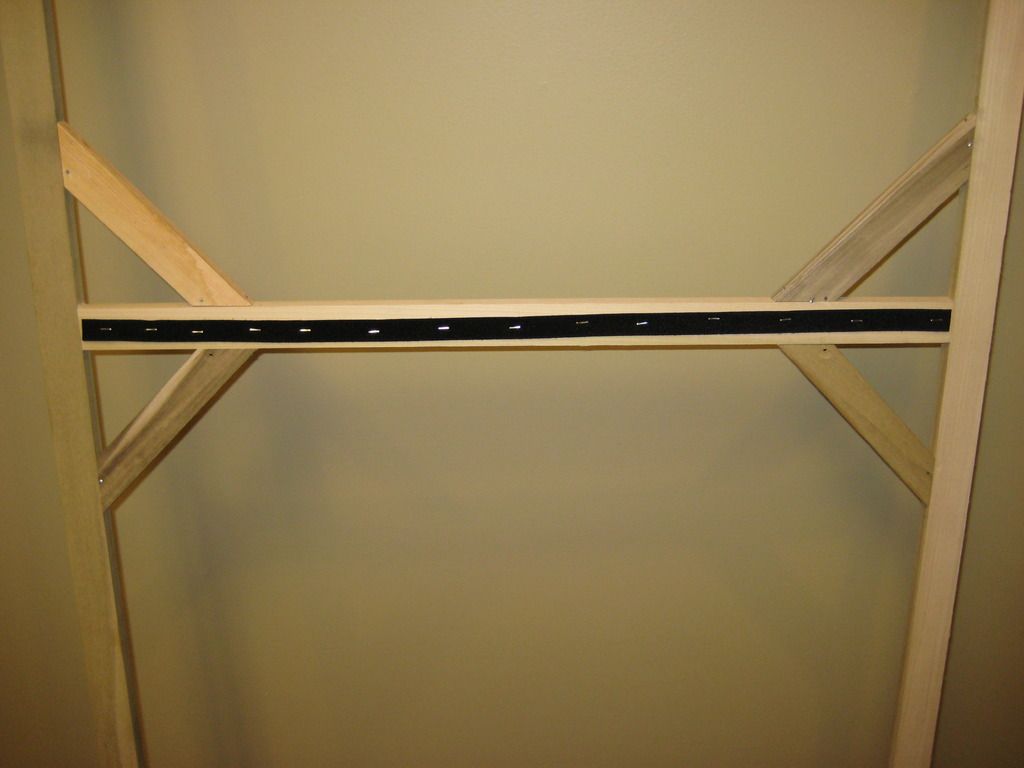
For the next steps I have to appologize as I didn't do a very good job at documenting the steps with photos. However, the process is very simple. Simply lay your fabric out on the ground and spread it out. Then you will lay the frame you just build on top of it. Center it up and make sure you design is lined up if you chose a fabric with one. Now you will start at the top or bottom and fold the fabric over the frame and staple it down. I try not to go quite all the way to the corners as it will give you some flexibility when attaching the other side and making a corner. With the top or bottom done, go directly to the opposite side and do the same making sure that you pull the fabric snug without distorting the patter if you have one. Once you have the top and bottom done, choose one side. I like to start in the middle and work out so that I can have my corners loose to create a neat fold. When you have one side done, move again to the opposite side and pull snug and staple.
Now for the most tricky part. Here is a video from some other panels I built showing how I do the corners.
Once you have the corners complete you are ready to attach your panel cover to your framing built into the wall holding the insulation. Line up the edges and Velcro sections and press them together. Once you do this your Superchunk bass trap is complete.
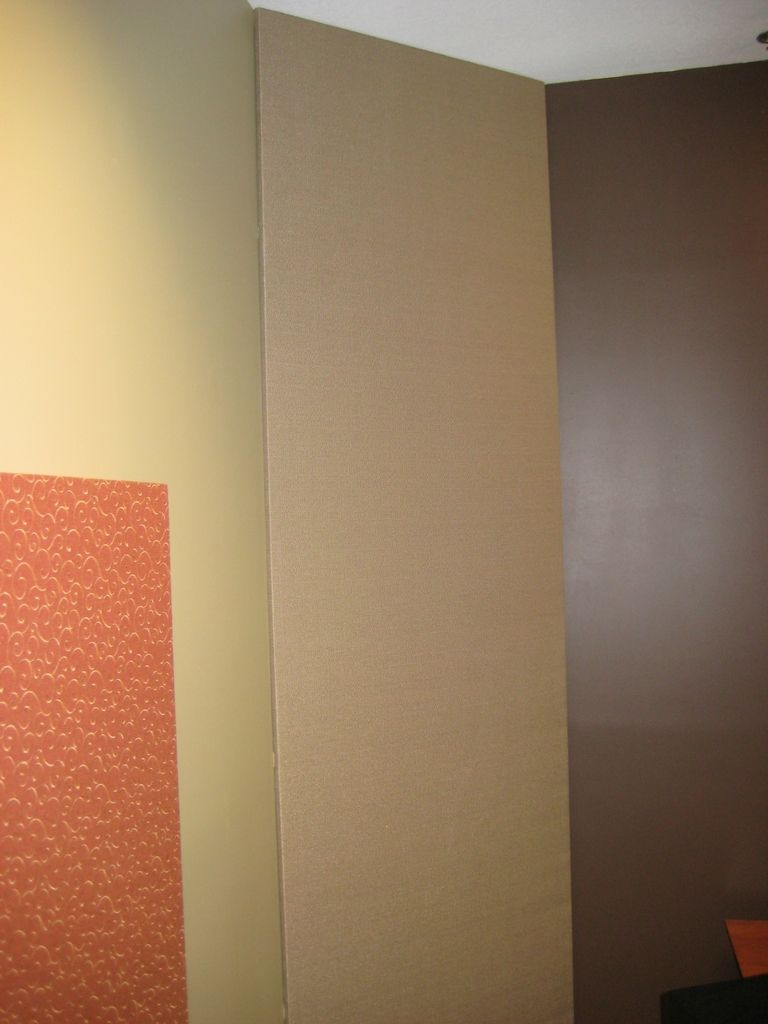
This one shows the bottom and what it looks like with it floating above the trim.
I am always open to feedback and questions. If you need further explanation on a section or you feel it needs to be written more clearly, please let me know. I want to make this tutorial as useful as possible. It would also be great for members to chime in if they have ideas on how to make these better, easier, etc...
What you will need
Tools
Saw - just to cut 1x2's
Utility knife
Tape measure
Pen/Pencil/Sharpie
Glove - optional, but helpful
Staple Gun
Drill
Screwdriver - powered is ideal
Straight edge
Materials
Roll of unfaced insulation - this is the kind without paper backing. I used R-19
1x2's
Screws
Roll of Velcro
Screws
Zip-its - depending on if you hit a stud or sheet rock
Flat piece of wood for base
Cloth of your choice - acoustically transparent of course
The first step is to decide how large of a bass trap you want. I used R-19 that was 23" wide so that it would give me roughly a 32.5" face. You can use the 15" wide for roughly a 21" face. I chose the larger because the room these went in needed more absorption. You may do some research and find that the wider faced (and therefore deeper) traps perform better for this type of bass trap. I also chose R-19 because it was the best balance of cost of material and trying to reduce the number of cuts I had to make. This stuff can be itchy. If you use thinner, you will need more pieces. Measure the height of your ceiling and determine how many pieces you will need based upon the thickness of material you choose. It will compress slightly. As part of my method, I wanted to minimize this.
Start by unrolling the insulation and using a strait edge to cut it into squares based upon the width you chose.


Once you have squares, cut them in half diagonally. These will be the pieces you stack to create the bass trap.

Once you have the amount of wedges you need, you are ready to build the bottom platform. I built mine this way because the room has trim and I wanted the bass trap to start on top of the trip so the front cover fit better and did not protrude out. I built this by cutting 1x2's with 45" on each end so that the longest side was the same length as the outer edges of my insulation wedges (not the face of the trap).
Notice the direction of the 45 degree cuts and how they fit together in the corner. You will also want to note that the way to cut the board is with the 2" portion vertical so it gives you the most area to attach it to the wall later.


Now you will need to attach these to the wall. If you know where the studs are, this is ideal. If not, you can use something like a zip-it (wall anchor) to screw into sheet rock. Either way, make sure that you pre-drill the 1x2's so they do not split. The picture below shows the 1x2's sitting right on top of the trim to start my base.

I then used a piece of wood and cut a triangle the same size as my insulation wedge for the insulation to sit on and not sag. This doesn't have to be any special type of wood. Just something sturdy. I did screw the wood into the 1x2 base.

Next you will repeat the same steps with the 1x2's every couple of feet up the wall. This is so that you can stack a small amount of the insulation and keep it from collapsing under its own weight.

Instead of using a wood platform for the additional supports, you will need to cut an additional 1x2 with 45's so that the longest side is the same width as the width of the face of your Superchunk. These pieces will become multi functional later in the process. These will need to be screwed into the existing 1x2's already attached to the walls. Be sure to pre-drill.

Now that you have multiple shelves built to act like a skeleton, you will need to provide some more support so that the insulation doesn't sag through the middle. For this we don't want wood that creates multiple chambers, but rather an acoustically transparent shelf. For this, I cut and stapled some inexpensive fabric that was stretched across the frame.

Repeat this process for the remainder of your additional supports. Once this step is completed it is time to create an attachment point for the front frame/cover. I used a roll of Velcro that can be found at any hobby store. I cut pieces the width of my front facing 1x2's and stapled to them. No need to do every single one as I found that going every other one for me held the front frame/cover in place. For me, this was one at the top, bottom and a couple in the middle.

Now it is time to start stacking the insulation wedges in each of the sections you have created.


I found that with R-19 is seemed to be about 4 pieces that would fit nicely without compressing too much under its own weight. You may have different results based upon what insulation value you choose. Also notice the Velcro strips as they are about to come into play again.
Once the corner is full of insulation, you will want to make a cover for them that keeps the fibers in and has a nice finish. I chose to build a simple frame that would act like a speaker grill. They are also removable if I were to need to access the material for any reason. Thus the reason for the Velcro. All you really need is a simple frame that is as tall and wide as your trap. In the corners you will want to pre-drill a hole and use some screws to connect the 2 pieces. With the outside structure of the frame built, you will need a couple more strips that will help brace it and attach it to our corner frames. In order to do this, you will need to measure from the bottom of your base to the strips of wood that you applied the Velcro to. Cut a cross brace and screw it into place on your outer frame at the measurement you just took. Repeat this for however many Velcro points you have. For mine, this was 2 cross braces as I used Velcro at the top and bottom for a total of 4 attachment points. Once you have these braces in place you can add some additional corner braces to keep the cover from flexing. To do this, simply use some of the scrap lumber you have from previous cuts to make a few short pieces and cut 45's on each end.
Note that you will want to cut the 1x2 so that with 2" portion will be facing you so that the frame is more flat. You may also want to spend the extra for premium 1x2's for the frame as they are much straighter and this will be the part that is seen. For the sections attaching to the wall, standard 1x2's are fine as you will be cutting them down and can help avoiding some of the really curvy ones.
Here is one with the outer frame and cross braces. Note that yours may not turn out exactly like mine with the smaller section at the top. It just so happens that with the ceiling height I was working with and allowing for 4 sections of the insulation, this is simply how it turned out.

Here it is with the additional corner braces.

Once your frame is built you can staple a strip of Velcro at the cross brace that matches up with the shelf you built in the corner that also has Velcro. Many of the rolls you can buy of this are double sided so make sure you have the opposite side exposed towards the wall brace so it will hold. You can also leave the strip just a bit short as you will want to leave room for your finishing fabric to be stapled around the frame.

For the next steps I have to appologize as I didn't do a very good job at documenting the steps with photos. However, the process is very simple. Simply lay your fabric out on the ground and spread it out. Then you will lay the frame you just build on top of it. Center it up and make sure you design is lined up if you chose a fabric with one. Now you will start at the top or bottom and fold the fabric over the frame and staple it down. I try not to go quite all the way to the corners as it will give you some flexibility when attaching the other side and making a corner. With the top or bottom done, go directly to the opposite side and do the same making sure that you pull the fabric snug without distorting the patter if you have one. Once you have the top and bottom done, choose one side. I like to start in the middle and work out so that I can have my corners loose to create a neat fold. When you have one side done, move again to the opposite side and pull snug and staple.
Now for the most tricky part. Here is a video from some other panels I built showing how I do the corners.
Once you have the corners complete you are ready to attach your panel cover to your framing built into the wall holding the insulation. Line up the edges and Velcro sections and press them together. Once you do this your Superchunk bass trap is complete.

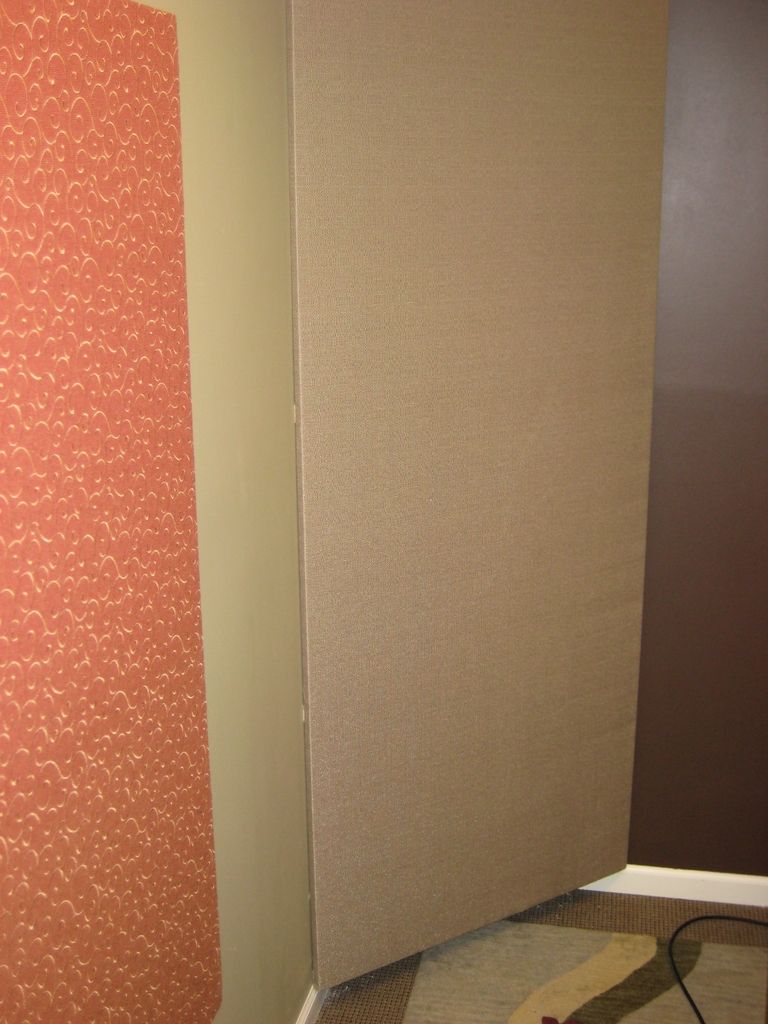
This one shows the bottom and what it looks like with it floating above the trim.

I am always open to feedback and questions. If you need further explanation on a section or you feel it needs to be written more clearly, please let me know. I want to make this tutorial as useful as possible. It would also be great for members to chime in if they have ideas on how to make these better, easier, etc...


