Low Cost Streaming via Raspberry Pi/Volumio
Sept 17, 2017 11:15:03 GMT -5
hemster, geebo, and 4 more like this
Post by klinemj on Sept 17, 2017 11:15:03 GMT -5
So, I've been looking for an easy way to stream music to my system of all ranges of quality. I have Sonos and I really like it and will continue to use it. But, I need to add a unit to feed my new headphones, because I am re-deploying a Sonos unit that is in that area to serve another area. And, I didn't want to buy another Sonos unit. After a lot of searching, I thought - hey - for $35...let me give this Pi thing a try. Why not, right?
Well, it wasn't $35...for $64.99 on Amazon, I bought a kit that included the Pi-3, 2 little heat sinks, a MicroSD card (pre-loaded with the OS), a nice little case, an HDMI cable, onboard wifi and ethernet, and a power cable. The one I got was the "CanaKit Raspberry Pi 3 Complete Starter Kit - 16 GB Edition" but there are many options. Since you can google that and see it, I didn't post a picture of it.
It took only about 10 minutes to put the kit together...drop the CPU/card into the bottom of the case. Then the base has a "ring" of plastic that slides over the top of the bottom and the actual Pi-3, and a top is pushed on to that. So, there are no screws...it doesn't really even "snap" together...it just is pretty much a frictional fit but it seems to stay together. With that, all "hardware assembly" is done. I had to fiddle around and try it a few times because it was initially not fitting - I had not evenly placed the board into the case's bottom. Careful to not force it! There are various connections that come up off the board - like the HDMI, USB, and power connectors. I started to force it and realized the power connector was in the way. I bent it a little but was able to bend it back..."it's Ooooohhhhh----kaaayyyy" (EDIT: I also had to peel release tape off the back of the heat sinks and place them on 2 chips on the circuit board. Did that within the 10 minutes also!)
Then comes software...I chose to use Volumio which is a media player AND the operating system. Search Volumio and you can find it easily...download the version for the Pi to a computer. I downloaded to my Surface laptop (Windows 10 Pro). You will need to extract the Pi file from the zipped folder that downloads, and then "image" it to a MicroSD card. Note that this is not "copying"...I tried that...doesn't work! I used Win32DiskImager (a freebie download) to write/image the Pi file to the MicroSD card. (Note: The MicroSD card that comes with the kit is pre-loaded with the standard Pi OS...which I didn't use. I used a different MicroSD card that I made sure was formatted to FAT32. I saved the stock MicroSD in case I need it for something else.)
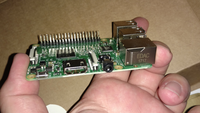
Then you insert the imaged MicroSD card into a slot in the case...it slides the card into a friction-fit slot in the circuit board (that's near where my thumb is in the picture below).
Since I am using a USB DAC (my DC-1), I plugged in lines for the USB out to the DC-1, an HDMI cable to my TV, a USB dongle for a wireless keyboard, an ethernet cable (that goes to a wall jack), and then plugged in the power. Shortly after that - I could see on my TV screen that things were happening...it asked me to provide the user ID and PW for the Pi (which are Pi and Raspberry...how clever), and then it asked for me to enter the user/PW for Volumio. This stumped me as I didn't see it coming and didn't know what they were. the documentation in the start up guide says "once Volumio has finished booting you will see a login prompt, which is absolutely fine" What it doesn't say is that you can ignore that part.
From there, go to volumio.local/playback and you will see the control screen for Volumio (you can also get to it via the Pi's IP address...in case you have more than one in your house). You can link network storage devices where you have tunes ripped or get tunes from the net. So far, I learned it's hard to get a NAS linked...it seems Volumio is "finicky" on details and there doesn't seem to be an easy way to direct it (like - you can't just browse your network for it and click "this one"...you have to enter details, and if you don't get it exactly right - it gives an error message that goes away before you can even read it...). So, I'm just going to plug a spare USB drive with all my tunes on it into the Pi. I thought there was a Tidal plug in, but I have not yet found it...will be looking
Anyway, to test it out, I just used the available internet radio stations and started one playing. Given the TV was connected via HDMI, it started playing there. There's a little gear-looking icon in the top right. I clicked that and chose "playback options". In there, one of the choices was USB...I chose that, and suddenly my DC-1 was streaming music to my old Rotel amp! Easy!
Also, in the startup guide, there's a caution that if you use volumio to control volume, you lose audio quality. But, you can choose the option "hardware mixer" for the volume control and use the DC-1's volume control (this is also under "playback options". As soon as the DC-1 was connected, the software knew that was an option and automatically switched to it. (Nice!)
So, there I was...listening to tunes!
now - to go get that spare USB HD filled with tunes and plug it in. Then, I will figure out Tidal. Also, it looks like I can stream from my Surface to Volumio....there is info on that in the on line guide also...going to try that later.
Meanwhile - enjoying streamed tunes for cheap!
And, by the way, now that I am done with the setup, I can remove the dongle for the wireless keyboard and the HDMI line to the TV...no longer needed.
Here are a few pix...first, the kit:
Attachment Deleted
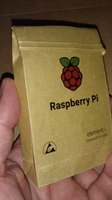
Inside the box that has the Pi, there's this tiny little bag:

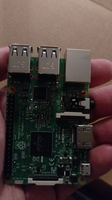
Isn't that just cute...and inside that is the actual "computer". When they say it is credit card sized...they are not kidding!


So, for all of you waiting for a cheap streamer - here's an option...
Mark
Well, it wasn't $35...for $64.99 on Amazon, I bought a kit that included the Pi-3, 2 little heat sinks, a MicroSD card (pre-loaded with the OS), a nice little case, an HDMI cable, onboard wifi and ethernet, and a power cable. The one I got was the "CanaKit Raspberry Pi 3 Complete Starter Kit - 16 GB Edition" but there are many options. Since you can google that and see it, I didn't post a picture of it.
It took only about 10 minutes to put the kit together...drop the CPU/card into the bottom of the case. Then the base has a "ring" of plastic that slides over the top of the bottom and the actual Pi-3, and a top is pushed on to that. So, there are no screws...it doesn't really even "snap" together...it just is pretty much a frictional fit but it seems to stay together. With that, all "hardware assembly" is done. I had to fiddle around and try it a few times because it was initially not fitting - I had not evenly placed the board into the case's bottom. Careful to not force it! There are various connections that come up off the board - like the HDMI, USB, and power connectors. I started to force it and realized the power connector was in the way. I bent it a little but was able to bend it back..."it's Ooooohhhhh----kaaayyyy" (EDIT: I also had to peel release tape off the back of the heat sinks and place them on 2 chips on the circuit board. Did that within the 10 minutes also!)
Then comes software...I chose to use Volumio which is a media player AND the operating system. Search Volumio and you can find it easily...download the version for the Pi to a computer. I downloaded to my Surface laptop (Windows 10 Pro). You will need to extract the Pi file from the zipped folder that downloads, and then "image" it to a MicroSD card. Note that this is not "copying"...I tried that...doesn't work! I used Win32DiskImager (a freebie download) to write/image the Pi file to the MicroSD card. (Note: The MicroSD card that comes with the kit is pre-loaded with the standard Pi OS...which I didn't use. I used a different MicroSD card that I made sure was formatted to FAT32. I saved the stock MicroSD in case I need it for something else.)
Then you insert the imaged MicroSD card into a slot in the case...it slides the card into a friction-fit slot in the circuit board (that's near where my thumb is in the picture below).
Since I am using a USB DAC (my DC-1), I plugged in lines for the USB out to the DC-1, an HDMI cable to my TV, a USB dongle for a wireless keyboard, an ethernet cable (that goes to a wall jack), and then plugged in the power. Shortly after that - I could see on my TV screen that things were happening...it asked me to provide the user ID and PW for the Pi (which are Pi and Raspberry...how clever), and then it asked for me to enter the user/PW for Volumio. This stumped me as I didn't see it coming and didn't know what they were. the documentation in the start up guide says "once Volumio has finished booting you will see a login prompt, which is absolutely fine" What it doesn't say is that you can ignore that part.
From there, go to volumio.local/playback and you will see the control screen for Volumio (you can also get to it via the Pi's IP address...in case you have more than one in your house). You can link network storage devices where you have tunes ripped or get tunes from the net. So far, I learned it's hard to get a NAS linked...it seems Volumio is "finicky" on details and there doesn't seem to be an easy way to direct it (like - you can't just browse your network for it and click "this one"...you have to enter details, and if you don't get it exactly right - it gives an error message that goes away before you can even read it...). So, I'm just going to plug a spare USB drive with all my tunes on it into the Pi. I thought there was a Tidal plug in, but I have not yet found it...will be looking
Anyway, to test it out, I just used the available internet radio stations and started one playing. Given the TV was connected via HDMI, it started playing there. There's a little gear-looking icon in the top right. I clicked that and chose "playback options". In there, one of the choices was USB...I chose that, and suddenly my DC-1 was streaming music to my old Rotel amp! Easy!
Also, in the startup guide, there's a caution that if you use volumio to control volume, you lose audio quality. But, you can choose the option "hardware mixer" for the volume control and use the DC-1's volume control (this is also under "playback options". As soon as the DC-1 was connected, the software knew that was an option and automatically switched to it. (Nice!)
So, there I was...listening to tunes!
now - to go get that spare USB HD filled with tunes and plug it in. Then, I will figure out Tidal. Also, it looks like I can stream from my Surface to Volumio....there is info on that in the on line guide also...going to try that later.
Meanwhile - enjoying streamed tunes for cheap!
And, by the way, now that I am done with the setup, I can remove the dongle for the wireless keyboard and the HDMI line to the TV...no longer needed.
Here are a few pix...first, the kit:
Attachment Deleted
Inside the box that has the Pi, there's this tiny little bag:

Isn't that just cute...and inside that is the actual "computer". When they say it is credit card sized...they are not kidding!


So, for all of you waiting for a cheap streamer - here's an option...
Mark


